Getting it printed
The 3D Print tab collects what you need between a finished model and a slicer. It has two groups: Prepare (Place on Bed, Measure, Print Info, Tolerance, Overhangs, Wall Thickness) and Output (Export and, on the desktop app, Send to Slicer). None of the checks changes your model. They colour it or give you numbers, so you can run them as often as you like.
Export a model
Press Export in the Output group (or Home › Files › Export Model). The Export model dialog lists the design's bodies. Tick the ones to export, or tick All bodies. Hidden bodies are listed too, marked "hidden", so you can export a part you have tucked away.
Pick a Format:
- 3MF is the one to use for slicers. It keeps the body names, their colours and the unit, so a multi-colour model arrives in your slicer already split into named objects.
- STL is binary and opens anywhere. It has no names or colours, and all the bodies share one list of triangles.
- STEP holds exact geometry in millimetres, for other CAD programs. It has no resolution, because nothing is turned into triangles. A body's colour goes into the file. Mesh bodies cannot go into a STEP file.
For 3MF and STL you also pick a Resolution, which is how closely the triangles follow a curve:
| Resolution | Largest gap to the true surface | Largest angle between neighbours |
|---|---|---|
| Coarse | 0.1 mm | 30° |
| Medium (the default) | 0.02 mm | 15° |
| Fine | 0.005 mm | 5° |
| Custom | Deviation, your value | Angle, your value |
A printer resolves around 0.05 mm, so Medium is already finer than a print shows. Choose Fine only for a large smooth sphere or a lens, and expect a bigger file. The dialog remembers your format and resolution.
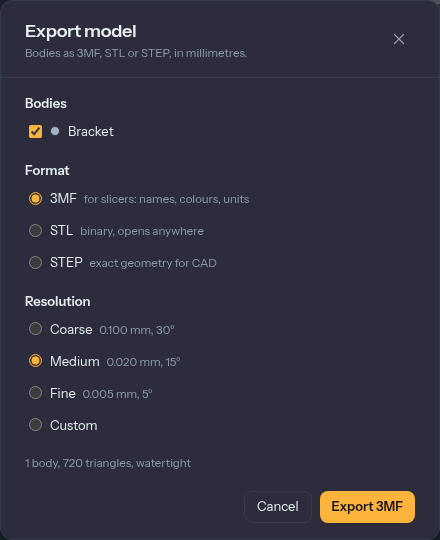
The line under the options tells you what you will get: how many bodies, how many triangles, the file size, and whether the mesh is watertight. A slicer needs a closed surface. If a body is not closed, the line lists which, and the slicer will try to repair it. That is rare with bodies built in Extrudo. It happens with an imported mesh that was already broken.
Export 3MF (the button follows the format) downloads the file.
Lay it flat: Place on Bed
Most prints need a flat face on the bed. Place on Bed turns a body so the face you pick lies on the floor of the model (z = 0), and drops it to the floor. Pick one flat face per body. Spin then turns the body about the vertical, for when you want it rotated on the bed.
It is a feature on the timeline, so you can change the face later, and it does not change the body's shape. If the face is already down, it says so and does nothing.
Print Info: weight, filament and cost
Print Info adds up the volume of the bodies that are shown and estimates what the print will use:
- Volume of the solid.
- Printed (est.), the plastic actually laid down, which is less than the volume because most prints are hollow inside.
- Weight, Filament length and Cost.
Set the Material (PLA, PETG, ABS, TPU, or Custom density), the Filament diameter (1.75 or 2.85 mm), the number of Walls, the Line width, the Infill percentage and the Price per kg. The estimate counts the walls as a skin of that many lines and fills the interior at the infill percentage. At 100 % infill it is simply the solid's volume.
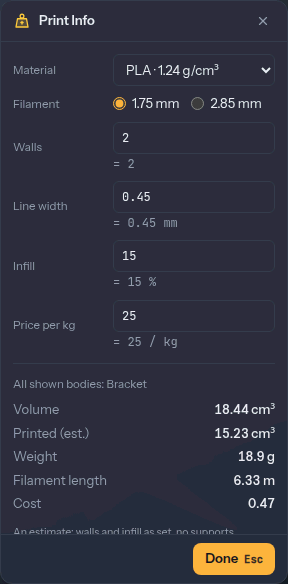
These settings belong to you, not to the design. They are kept in your browser and are not
undone with Ctrl+Z. The estimate does not include supports, because only a slicer can
generate those, so treat the numbers as a good guess and the slicer's as the final answer.
Overhangs
Overhang Analysis shades the faces that lean out further than an angle, because they will need support. The Angle is 45° at first. Down says which way the bed is: an axis, or Use selected face to say that a flat face you have selected is the bottom. The panel says how many faces overhang and their area ("1 face overhang, 226 mm² in all."). Faces lying on the bed are left out.
It shades per triangle, so a smooth curve gets a gradient rather than a hard edge. The shading follows your edits.
Wall Thickness
Thin walls print weak, or with gaps. Wall Thickness shades walls thinner than a Minimum, which starts at two lines of your Print Info line width (0.9 mm at 0.45 mm). The panel reports the thinnest wall and the area that is too thin, and a label marks the thinnest spot.
The numbers come from the mesh you see, so a wall within a hair of the minimum can go either way. Use it to find what to thicken, then confirm with the slicer.
Look inside: Section Analysis
Section Analysis (Shift+S, in Inspect) cuts the view through a
plane and fills the cut, so you can see walls, hollows and internal features. Pick an origin
plane, a construction plane or a flat face, then drag the arrow or type an Offset.
Flip chooses which side stays. Add plane (shown once a plane exists) adds up to three
planes, and Box clips to a box instead. Box is also offered on the empty panel beside the
planes, so a box section needs no plane first.
Section is only a view. It changes nothing in the model and is not part of an export. Its entry in the browser's Analysis folder has an eye to switch it off and on.
Print tolerance
Parts that fit together need a gap. Tolerance sets one number, the
parameter tolerance, that hole presets and threads add to their sizes. The panel has Tight
(0.1 mm), Normal (0.2 mm) and Loose (0.3 mm) buttons, or type your own. Print a small
test piece first and see which fits your printer. The full explanation is in
parameters and expressions.
Send to Slicer (desktop)
In the desktop app there is a Send to Slicer tile next to Export. It writes the file to a temporary folder and starts your slicer on it, without a download in between. It finds PrusaSlicer, OrcaSlicer, Bambu Studio and Cura. In the web app the tile is there but greyed out, because a browser cannot start programs. There you export the file and open it yourself.