The app in five minutes
This page shows you where everything is. The next ones go deeper: sketching, features and the timeline and parameters.
Where a key is written with Ctrl, it is ⌘ on a Mac.
Opening it
Open https://app.extrudo.org in a current Chrome, Edge, Firefox or Safari. There is nothing to install and no account. After the first visit the app is kept in your browser, so it also opens without a connection.
There is a desktop app too, with the same screens: an AppImage or deb on Linux, an installer
on Windows and a dmg on macOS (also brew install --cask zoltanf/extrudo/extrudo). It opens
.extrudo files from your file manager and updates itself, except as a deb or on macOS.
The home screen
You start on the home screen:
- New design opens an empty design in millimetres.
- Import… adds a design from a file: an
.extrudoor.f3ddesign, or a STEP, mesh or OpenSCAD file, which becomes a new design with the Import Model dialog open. - Start from a template shows the templates: the Wall bracket, Storage box, Box with a lid and PCB enclosure. Each opens as a copy, with parameters and a timeline to poke at, which is a good way to see how a finished design is put together. While you have no designs the templates are always shown; once you have some, they fold away so your designs come first.
- Take the tour builds a first box in five short steps, with a card that follows what you do.
- More examples…, under the templates, lists further designs. Each one opens as a copy you can edit.
- Your designs lists what is stored in this browser, with search and sorting.
The layout
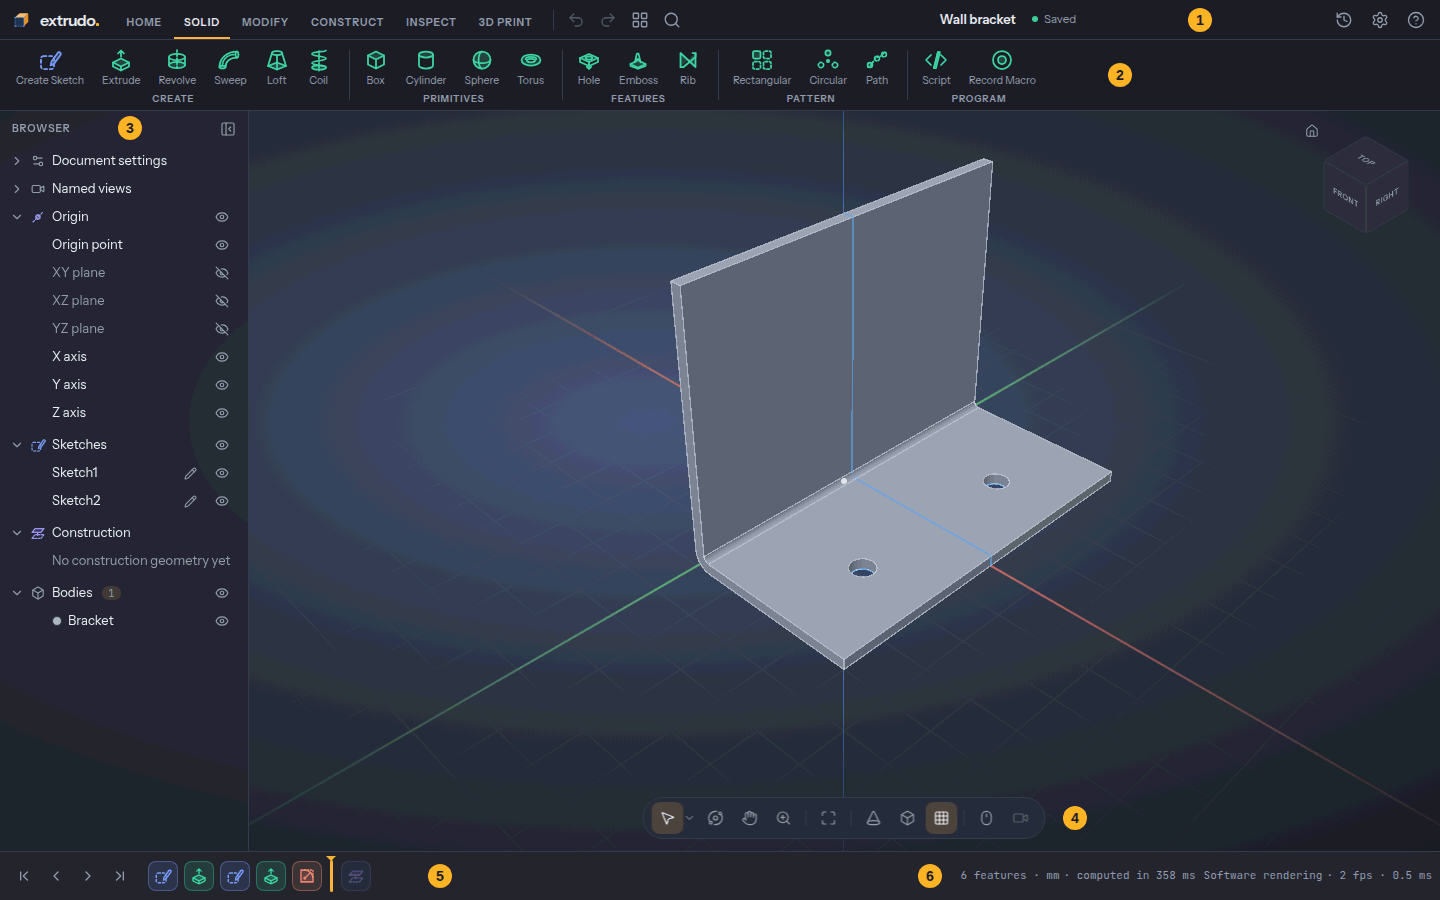
- The top bar has the logo (back to the home screen), the tabs, Undo, Redo, Toolbox and Search commands, then the design's name with its save state, Version history, Settings and Help.
- The toolbar shows the groups of the selected tab. In a model the tabs are Home, Solid, Modify, Construct, Inspect and 3D Print; while a sketch is open they are Home, Sketch and 3D Print. Home holds what concerns the whole design: files, versions, parameters, plugins. When a group has more tools than fit, the rest are under its ▾ menu.
- The browser lists the origin, sketches, construction geometry and bodies. The eye hides
or shows an item, a click selects it, and
F2renames. - The view is where the model is. The ViewCube in its corner turns the model, and the navigation bar under it holds Select, Orbit, Pan, Zoom, Fit, Orthographic, the visual style, the grid and the mouse controls.
- The timeline is the row of chips along the bottom: one per sketch or feature, in the order they were made. See features and the timeline.
- The status bar is at the right end of the same row: how many features there are, the unit, whether the model is computing, and what your selection measures.
The save state next to the name reads Saved, Saving…, Edited or Couldn't save. It shows a word when there is room; when the bar is narrow it drops to the dot, and the word is in the dot's tooltip.
Moving the view
The default mouse controls are:
| To | Do this |
|---|---|
| Orbit | Drag with the middle button |
| Pan | Drag with the right button |
| Zoom | Turn the wheel (it zooms towards the pointer) |
| Fit everything | F6 |
| Fit what is selected | Ctrl+K, Look at Selection, or the right-click list |
The Mouse controls button in the navigation bar switches to the layout of Onshape / SolidWorks, Shift orbit (middle-drag pans, Shift+middle-drag orbits), Blender or a trackpad.
Seven keys jump to a named view: Shift+1 is the home view, then Shift+2 Top, Shift+3
Bottom, Shift+4 Front, Shift+5 Back, Shift+6 Left and Shift+7 Right. Clicking a face of
the ViewCube does the same. Orthographic in the navigation bar turns perspective off, which
is what you want when you read a position off the screen.
Beyond the seven standard views you can save your own named views (2026-10-10): the navigation bar's Named views menu lists them to restore, and Save Current View… stores where the camera is now (name, then Save). A saved view comes back exactly — including whether it was orthographic — as one entry of the design, so it survives undo, reload and export. The browser's Named views folder has the same views: a click restores, and the right-click menu updates one to where the camera is now, renames it or deletes it. Views hold only the camera: a section plane or a hidden body is not part of one.
Selecting
Hover to see what a click would take, click to select, and Shift or Ctrl with a click adds
to the selection or takes from it. Dragging a box from left to right selects what lies wholly
inside; from right to left it selects whatever the box touches. Esc clears the selection or
cancels the tool you are in.
What you can pick is set by the selection filter beside the Select button. If two things lie behind each other, right-click and choose Select other… to pick from a list.
Selecting before you choose a tool saves work: select an edge, press F, and the Fillet
dialog opens with the edge already in it.
Finding commands
There are four ways to a tool, and you will use all of them:
- The toolbar. Hover a tile for its name, key and, for some, a short clip.
- The right-click menu. Right-click without moving and a ring of eight wedges opens round the pointer, with a list under it that depends on what you clicked. In a model the ring has Sketch, Extrude, Fillet, Move, Press Pull, Undo, Repeat last and Delete; in a sketch it has Line, Rectangle, Circle, Dimension, Trim, Undo, Construction and Finish Sketch. A right-drag still pans. You can remap the wedges under Settings › Customize Marking Menu….
Ctrl+Kopens a search over every command. Type a few letters of a name and pressEnter.Sopens the toolbox at the top bar: your pinned tools as tiles, and the same search under them.Shift+Enteron a result pins it.
Every tool has its own page in the tool reference. The Help menu in the
top bar links to these pages: User Guide, Tutorials, Examples and Tool Reference
open on the docs site, and Tutorial starts the in-app tour. F1 opens the page of the tool
under the pointer (hover a toolbar tile first), or the guide when the pointer is over nothing.
Undo covers everything
Ctrl+Z undoes the last change and Ctrl+Y (or Ctrl+Shift+Z) redoes it. That includes
dragging a sketch point, changing a parameter, hiding a sketch, reordering the timeline and
renaming a body. A parameter that moves several sketches is still one step, and so is a whole
sketch session. The Undo button's tooltip says what it would undo.
What does not go on the undo stack is what you see rather than what you made: the camera, a section plane and the analysis overlays.
Where your designs are kept
A design is saved in your browser as you work, a moment after each change. The save state in the top bar says when it is done. Nothing is sent anywhere.
A browser can clear its storage when the disk is nearly full. The home screen tells you whether
yours promised not to: Stored on this device is good, Storage may be cleared means you
should keep a copy. To keep one, use Home › Export Design, which writes an .extrudo file
you can store anywhere and open again with Import Design (or Import… on the home
screen). The file holds the whole design, with its versions.
Ctrl+S does not save the file; it saves a named version inside the design, which you can restore or open as a copy from Version history. It is a good habit before a risky change.